
My thoughts compiled to create a tip sheet for the teachers from my district. These tips do not replace a thorough reading of the amazing teacher notes provided by the authors at Illustrative Mathematics. Begin your lesson planning there. You can find them linked HERE.
Lesson 6 Similarity
6.1 Warm up
- My first notice: The teacher notes before “Launch” say specifically that students are not expected to use the formal terms ( commutative, distributive, inverse). They are mentioned for your preparation in case students happen to bring them up. Don’t get tangled up in a vocabulary lesson. Focus on that there was only 1 answer, but more than one way to get there.
- My second notice: “Much of the discussion takes place between partners.” Don’t let this eat up class time. Pick one or 2 they don’t agree about and then move on.
6.2 – 6.4 Similarity transformations
My big notice – This lesson has the teaching first! The launch of 6.2 is basically the notes, then 6.2 – 6.4 activities practice the definition of similar. Each one is easier and more scaffolded than the one before.
6.2 Good for class discussion. Students really seemed to see that there were multiple points that could be translated onto each other, and that the point they chose changed the center of dilation.
6.3 Good to walk around and help kids while they work in groups. Accept rough sketches in this activity.
Questions I would ask to wrap up more quickly if you are in a time crunch:
- Which picture is oriented the same as Figure A?
- Which picture is larger than the original?
- Which is smaller?
- Does anyone want to check their thinking? (project and discuss – check with tracing paper or cut out.
6.4 This is optional. It is the most scaffolded of the 3 practice activities. Students just have to pick from a list of possible transformations instead of thinking them up themselves. For an RSP class or support class, this may be a great starting place. Or it might be one to save for during review.
Practice problems (HW) for lesson 6 – second part of number 1 could be a challenge problem. If you decide to assign it to everyone you may need to discuss the degree spacing of the rays. Since there are 6 in a quarter circle, they are each 15 degrees apart (90/6 = 15)
Lesson 7 – Similar polygons
Note – Polygons give extra things you can notice about similar figures . . . things that you can not see in “curvy” figures. Today we will find that for polygons, you do not have to write a series of transformations if you can show
- all the corresponding angles are equal, and
- all the corresponding sides are multiplied by the same scale factor.
7.1 Important vocabulary consolidating
Here is an extra example:
If you are in my period 2 class, then you are in 8th grade.
If you are in 8th grade, then you are in my period 2 class.
7.2 Use this to launch the class discussion. Don’t spend forever here. 10 minutes is probably more than you need. Get these two key facts out of the activity synthesis and write them on board.
- If corresponding angles are not equal, then shapes are not similar.
- If corresponding sides do not all have same scale factor then shapes are not similar.
Keep referring back throughout the period.
7.3 Needs Black line master cut up. This is a fun movement opportunity. Use the activity synthesis as is and then add notes to for their lesson synthesis.
Practice problems (HW) for lesson 7 – If there is time, use 2 and 3 to discuss activity 7.3 and what almost fooled them. If you do not have time, you might have students skip those problems.
Lesson 8 – Similar Triangles
Big picture for how this lesson fits in:

8.1 Warmup
Allows review of positives, negatives, order of operations, grouping. If time is tight, you could save this for your test or pretest day.
Connection to what we are doing today: more than one right way, but only one right answer.
8.2 Pasta Triangles -main thing for the day
I spoke with a teacher whose students really loved doing this with pasta. She did say it required front-loading that “We don’t eat our tools. We don’t throw our tools. We don’t leave our tools all over the floor. Just like you don’t eat your calculator or your ruler, this pasta does NOT go in your mouth.”
For me personally I felt like messing with the pasta and trying to get it just perfect ended up distracting me from the math takeaways of the activity.
Here is what my work looked like when I built triangles using pasta:
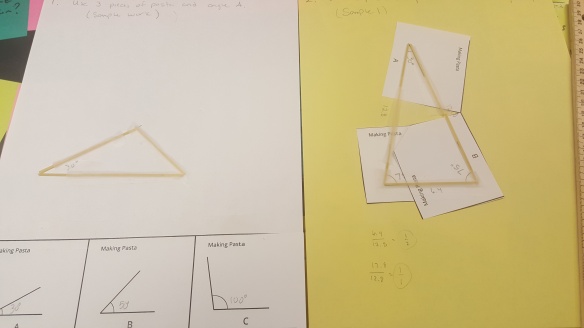
And here is what it looked like when I just drew in the sides using a straight edge:

In a moment I will explain how specifically I did it sans pasta.
But first . . .one other choice you have to make is do you want everyone at the group to have the same set of triangles or different sets? If you have different sets there needs to be a point in the class where they get to compare with other people who had their same set. This could be accomplished one of these ways:
- Have students with different sets use different color scratch paper to tape onto. Then stand and make a group of 3 or 4 that have the same color to compare.
- Ask students to tape the sets on a back cupboard or the board. “Set A tape your triangles here, Set B here, Set C here, Set D here.” Then look at the results together as a class. (Remember this is really the only activity you have to get through on this day.)
- Have students separate into the 4 corners of the room to compare, then return to their seats.
Even though you have the find your match issue, I think the “oh wow” factor is much greater when they are not sitting at the table together.
Here is how I ran it without pasta:
- I handed one black line master to each group and had them cut them into 4 strips of 3 angles each. Each person in the group got 1 set.
- I had them measure their three angles, rounding to nearest 5 degrees to move it along. Asked what they noticed, or what they added up to for those who noticed nothing. (Surprise! 180 degrees!)
- I asked what they could make with those three angles. Hear a straight angle and a triangle.
- I told them today we would be working with triangles. Our purpose today is to find a shortcut for checking if two triangles are similar. . . one that didn’t make us write an whole sequence of transformations and didn’t make us measure every side and angle.
Question 1 – Is knowing one pair of angles are equal enough to guarantee two triangles are similar? I had them predict silently – write yes or no in the bottom corner of their scratch paper. Then we proceeded to check:
- Everyone take your angle A.
- Tape it lightly to the scratch paper.
- Use your straight edge to extend the sides. You are the boss of the sides. Make them as long as you want. They do not have to be the same length.
- Use your straight edge to connect your two sides to form a triangle. Do you think your triangle is going to be similar to the other people that had your same angle? Let’s check.
- The first two sets had 30 degrees for angle A and the second two sets had 50 degrees for angle A. I had students hold theirs up toward me and (looking for variety) I picked 4 to 6 kids to stand up and hold their triangle so the class could see. We rotated the paper so that all the given angles were oriented the same way. We all agreed they were not similar.
Conclusion – one pair of matching angles does not guarantee the triangles are similar. I let them celebrate if they had predicted correctly, then I made a big deal of how bummed I was. That would have been such a great short cut! No measuring any sides, only measuring one pair of angles. I think this eventually made them value the shortcut when we got it.
Question 2 – what if we use all 3 angles? Does that guarantee they are similar? At least we wouldn’t have to measure sides. Again we predicted.
- Carefully peel your angle A off, turn your paper over, and tape it down on the back side. If it rips, use your protractor to measure and draw the correct angle.
- Use a straight edge to extend the sides for as long as you want. You are the boss of your sides. Try to make something other people won’t. Warning, really short sides are pretty difficult to use.
- On your angle B and C, use your straight edge to continue the sides to the edge of the small piece of paper.
- Take angle B and tape it down on the end of one of angle A’s sides. Be very precise in lining up the angle sides.
- Extend the other side of angle B. Keep extending until you can fit angle C onto both the side from A and the side from B. Students should notice that they need to draw all the way until the two sides meet to be able to place angle C. You will want to use this notice to draw out that only 2 angles are really needed. (I wonder about having half the class put on the third angle and the other half just have them draw to where the sides on angle A and B meet. Maybe that would be a good way to show that you don’t really need the third angle to get similar triangles.)
- Again have 4 to 6 students stand and show triangles. Since there are now 4 different triangle sets, this is where taping on a back cupboard with all the similar triangles on one door might be a nice way to debrief.
Question 3. I skipped question 3. Students got that only 2 were needed already.
8.3 – A chance to use the shortcut
If time allows, students can try out the shortcut, finding and proving three different triangles that are similar to triangle DJI by eyeballing and then measuring angles.
If time is short, doing a sample like problem 1 and problem 3 from the homework could also help consolidate the learning and prepare students for their practice problems.

Thank you so much!!!!
LikeLiked by 1 person
So glad it helped. 🙂
LikeLike
Thank you very much for this!
LikeLike